User Manual - Social Login
- Installing Social Login
- Uninstalling Social Login
- Compatibility
- Introducing Social Login
- Configuring Social Network Applications
- Getting Around
- Extension Configuration
- Managing Social Accounts
- Customer Area
- Adding a Social Login Widget
Magento 2 Social Login provides online shoppers with quick registration and authorization possibilities through social login buttons. A social login block can be added to login, register, cart, and checkout pages of a website. Add up to nine login options. Place a social login block in custom page positions as a widget. Define the display order of login options individually on each page. View all the linked social accounts from a single table.
Installing Social Login
Command Line Installation
- Backup your web directory and store database
- Download the Social Login installation package
- Upload contents of the Social Login installation package to your store root directory
- In SSH console of your server navigate to your store root folder:
cd path_to_the_store_root_folder |
run the following command:
php bin/magento module:enable Aheadworks_SocialLogin |
then:
php bin/magento setup:upgrade |
after:
php bin/magento setup:static-content:deploy -f |
5. Flush store cache; log out from the backend and log in again
|
Make sure the installation is done from the FTP Administrator account. Otherwise, set 775 permissions to the store root directory after the extension is deployed. |
Composer Installation
If you are installing an extension from Aheadworks for the first time, you need to add our composer repository to your Magento store:
1. Login to your ssh console and navigate to your store folder:
cd path_to_the_store_root_folder |
Run the following command:
composer config repositories.aheadworks composer https://dist.aheadworks.com/ |
On successful execution of the command you will be able to use the composer to install the extensions.
To install the extension:
2. Login to your ssh console and navigate to your store folder:
cd path_to_the_store_root_folder |
3. Run the following command to install the latest version of the extension:
composer require aheadworks/module-social-login |
if you need to install a specific version, run this command:
composer require aheadworks/module-social-login:<version> |
|
Specify the version of the extension in <version> |
When prompted, enter Public Key (Username) and Private Key (Password):

Both Public Key (Username) and Private Key (Password) can be found in My Projects and Licenses in your personal account on our site:

4. Enable the extension:
php -f bin/magento module:enable <Module_Name> |
|
Add the product name in <Module_Name> |
Next, register the extension:
bin/magento setup:upgrade |
Recompile your Magento store if you are in the Production mode:
bin/magento setup:di:compile |
To verify that the extension is enabled, run this command:
bin/magento module:status |
Clean store cache, by running the following command:
bin/magento cache:clean |
Log out and Log in the backend again.
To upgrade the extension:
5. To update or upgrade an extension:
Download the updated extension file. Take note of the module-name and version. Export the contents to your Magento root.
If a composer package exists for the extension, run one of the following.
Update per module name:
composer update aheadworks/module-social-login |
Updater per version:
composer require aheadworks/module-social-login:<version> |
Run the following commands to upgrade, deploy, and clean the cache.
php bin/magento setup:upgrade --keep-generated |
Uninstalling Social Login
Since Magento introduced declarative Database you need to be very carefull when uninstalling or disabling the module.
|
NOTE: Please be very careful when uninstalling/disabling this module. This module uses a declarative DB scheme. Once the module is uninstalled the DB tables will be lost. |
Manual Removal
1. Disable the module by executing the following commands:
php bin/magento module:disable Aheadworks_SocialLogin |
2. Remove the extension files from the following folder:
app/code/Aheadworks/SocialLogin |
Automatic Removal (via Composer)
1. Disable the module by executing the following commands:
php bin/magento module:uninstall Aheadworks_SocialLogin |
Compatibility
|
Module Version |
Magento Version |
PHP |
|
1.7.1 and earlier versions |
2.3.Х - 2.3.6 2.4.0 - 2.4.3 |
7.4 and earlier versions |
|
As of version 1.7.2 |
2.4.3 - 2.4.4 |
7.4, 8.1 |
|
As of version 1.7.3 |
2.4.4 - 2.4.6 |
8.1 |
Introducing Social Login
What's New?
The latest versions of the extension (1.7.0) enable the following:
- Integration with Smart One Step Checkout. If the Social Login extension is enabled, customers can login via Social Login on the checkout page.
Configuring Social Network Applications
1. Create an account on X (Twitter)

If you are new to X (Twitter), first, you will need to create an account.
The account is registered with the email address/phone or username. Make sure to fill in all the fields and follow the registration steps provided by X.
2. Register X (Twitter) application
In August 2020, Twitter introduced the concept of a Twitter project, a new way to organize your Twitter apps and to provide access to the v2 version of the Twitter APIs. If you haven't logged on to Twitter’s Developer Portal since August 1, 2020, you'll likely see a dialog box similar to this one the next time do log on:
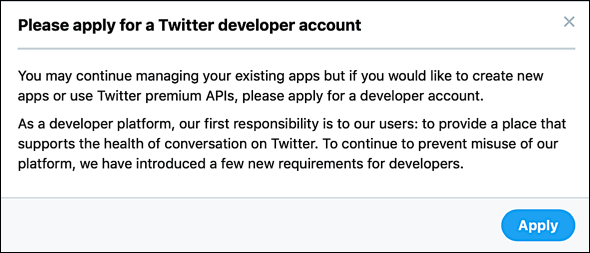
If you want to create a Twitter project, you must first apply for a Twitter development account; that process consists of answering a few questions about what your project/app is intended to do and what type of user data you want to access. Depending on your answers to these questions, your application could be approved immediately, or you might have to wait a few days for Twitter to make a decision.
That said, however, you don’t necessarily need to apply for a developer account nor do you need to create a project in order to use Twitter for social login. Any apps you created prior to August 2020 will still be available to you: you can still manage those apps and still use them for social logins. However, you will not be able to create new apps without a developer account.
Creating a Twitter Project and a Social Login App
Assuming your developer account is approved, the next time you log on to the Twitter Developer Portal your Dashboard will look similar to this:
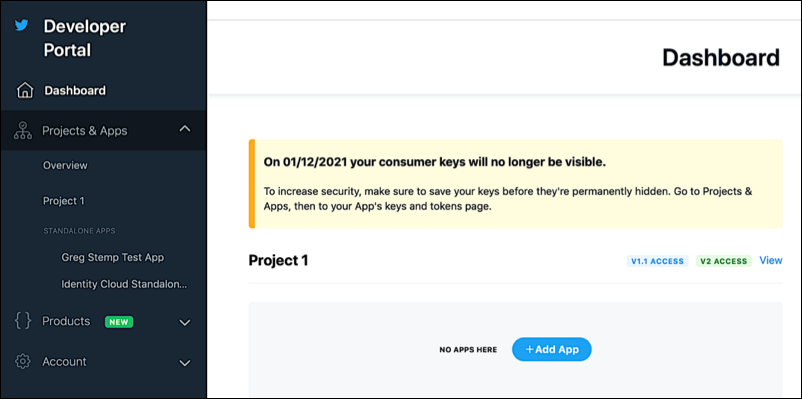
In other words, you’ll have a default project (Project 1) but not apps. Your first course of action is to add an app to that project.
To create an app, click Add App to display the Add your App page:
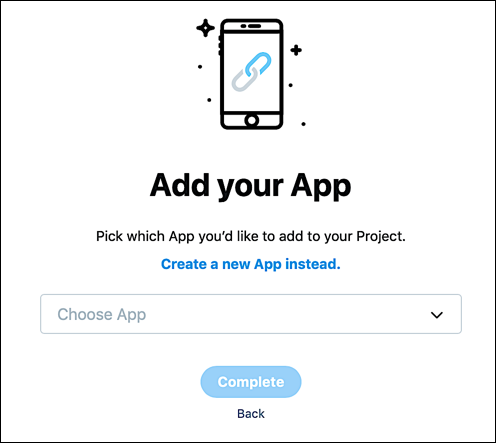
If you prefer, you can click the Choose App dropdown list and add one of your existing apps to your new project. For this example, however, we’ ll click Create a new App instead. When the Name your App page appears, type a unique name (unique across all of Twitter) for your app in the App name field and then click Complete:
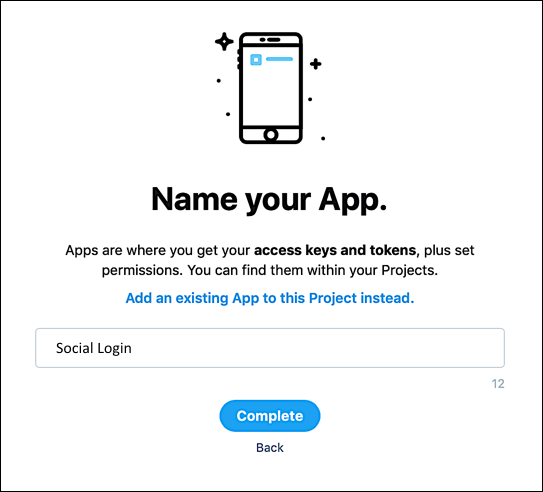
That creates your new app and displays the default app details:
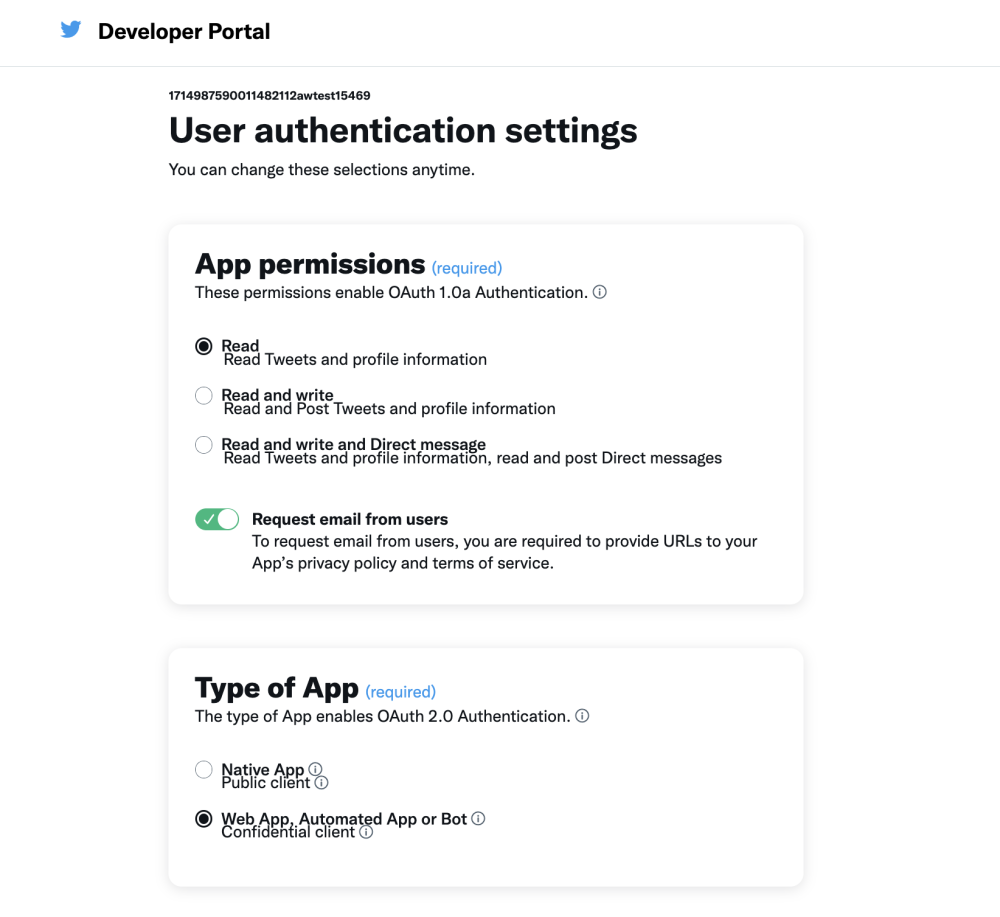
If you want to return a user’s email address after that yes has logged on, select Request email address from users:

Note that this is optional; you can use Twitter for social login without returning the user’s email address.
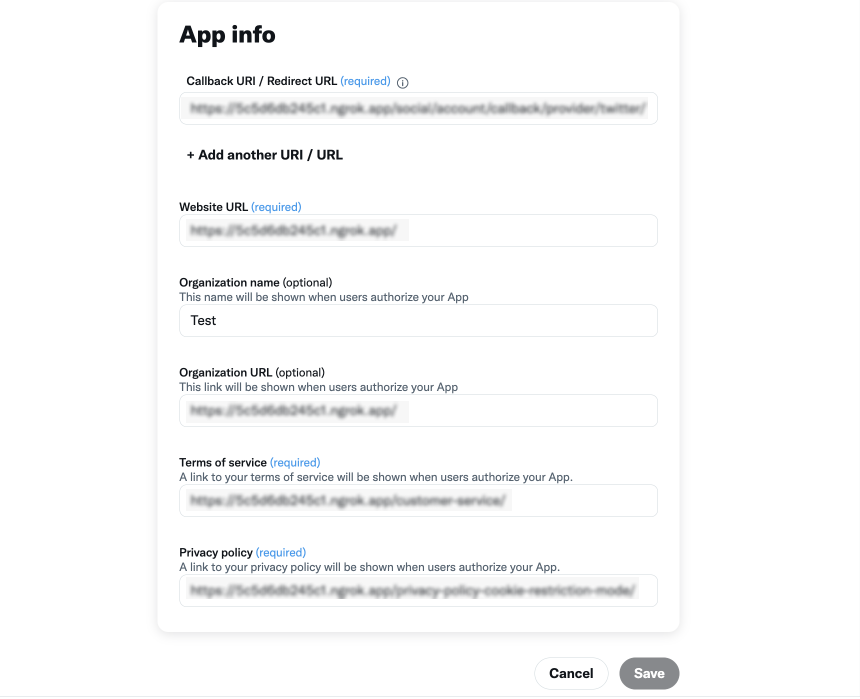
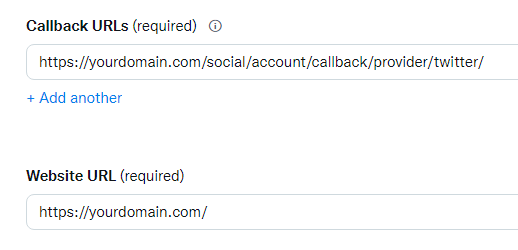
Enter your callback URI in the Callback URLs field, and enter the URL of your website in the Website URL field:
|
Starting from March 2018, all OAuth apps require a Valid OAuth redirect URLs list. Thus, each OAuth app redirect will be accepted only for URLs included in the list. For example, if https://example.com/facebook/callback is the only URL in the list, then redirects to https://example.com/facebook/callback/tokens or https://example.com/facebook/callback/redirects will no longer be allowed. The login attempt will fail if your app references a URL that is not on the list. This way, when creating a new key, your Valid OAuth redirect URL must have the following format: https://[Your domain name]/social/account/callback/provider/twitter/ Your callback URL will typically be your social login URL |
If you are returning user email addresses in your social login response then you must enter the URL to your terms of service in the Terms of Service field, and the URL to your privacy policy in the Privacy policy field:
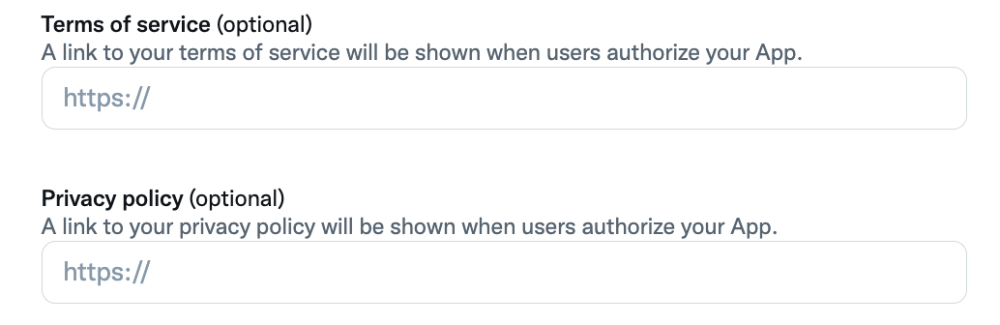
If you didn’t enable the Request email address from users setting then you can leave these two fields blank.
Click Save to save your new app.
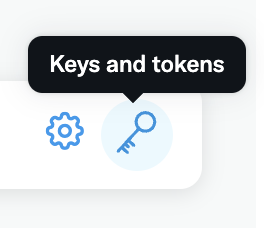
3. Get the API Key and Secret
-
To retrieve this information, click Keys and tokens:
2. On the Consumer Keys page, click the Regenerate button:
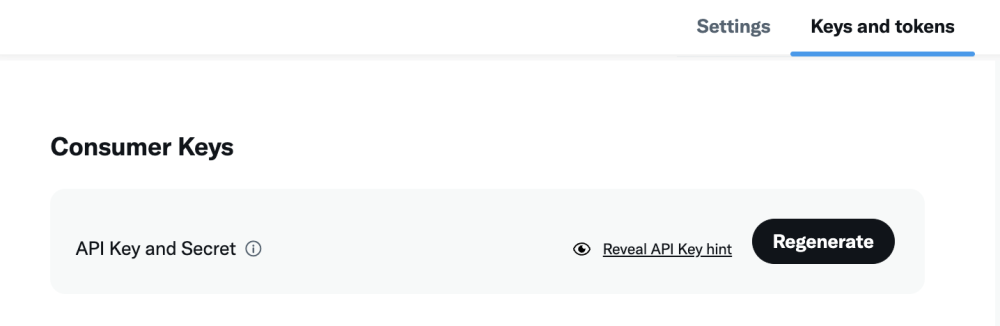
3. In the dialog box, click the Copy button located to the right of your API key and then paste the copied API key into a secure location (such as a password management program). Repeat this process to copy the API key secret:

4. When done, click Yes, I saved them to dismiss the dialog box. At that point, you can log off from the Twitter Developer Portal.
5. Navigate to Stores > Configuration > AHEADWORKS EXTENSIONS > Social Login;
6. Paste the Consumer Key and Secret into the appropriate fields of the Twitter configuration section.
That's it. Once enabled, the corresponding Twitter button will appear in the set social login block of your store.
|
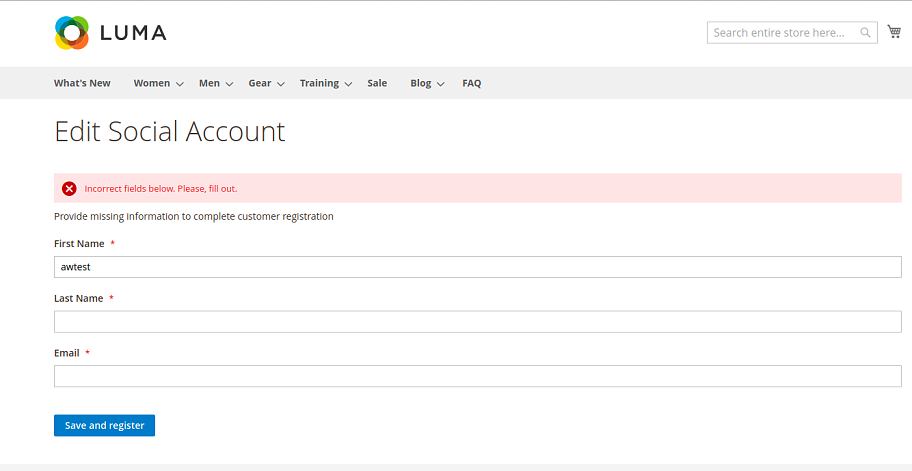
Note: Upon the first registration through Twitter, you will encounter a form requesting your First name, Last name, and Email. This information is necessary because Twitter does not automatically furnish it.
Once the users click the "Save and Register" button, their account is established, allowing them to log in. If users log out and revisit the platform later, they can effortlessly access their accounts by clicking "Login with Twitter" without requiring any extra registration steps. |
1. Register as a Facebook Developer
3. Set-up the Facebook Login product
3.1 Go to the Apps Panel, the App Dashboard's entry point. Navigate to Facebook Login and press the Set up button.

3.2 Select Web from the displayed platforms

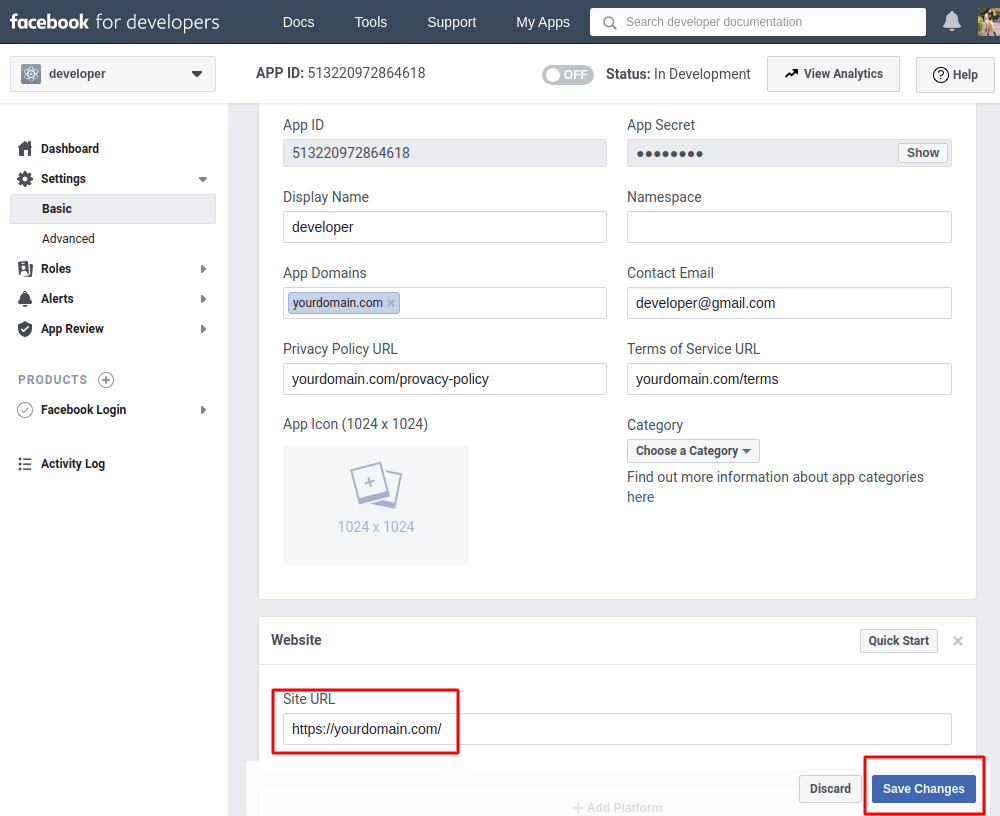
3.3 Go to the Settings section and choose Basic.
3.4 In the appeared menu some of the fields are generated automatically. All you need to do is fill in the rest of them, such as App Domains and Contact Email in particular. Please note these two are obligatory options. Privacy Policy URL and Terms of Service URL are optional, but we recommend you NOT to leave them blank. You will not be able to switch your application to live mode without them being set.
3.5 Once you've filled all the necessary fields, press the Add Platform button to move to the next step.

3.6 Select the Website from the list.

3.7 Set the website URL address in the Site URL field and press the Save Changes button.
3.8 Navigate to App Review and press Permissions and Features. Make sure all relevant permissions are requested (public_profile and email, for example)

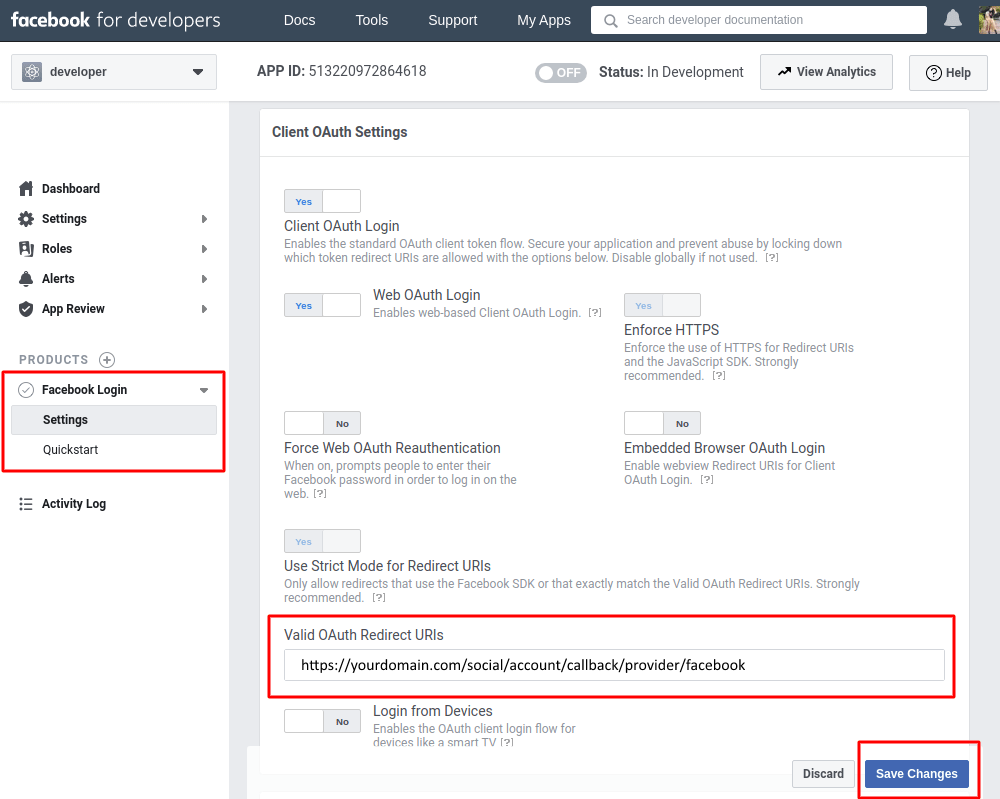
3.8 Navigate to Facebook Login section and press Settings.
3.9 Enter you Valid OAuth Redirect URLs. It differs depending on the software you are using it for. Usually, you can get OAuth Redirect URL in the software settings info. Make sure the Use Strict Mode for Redirect URls option is set to Yes, Web OAth Login is set to Yes, Enforce HTTPSoption is enabled and check that the section "Deauthorize / Deauthorize Callback URL" is empty.
|
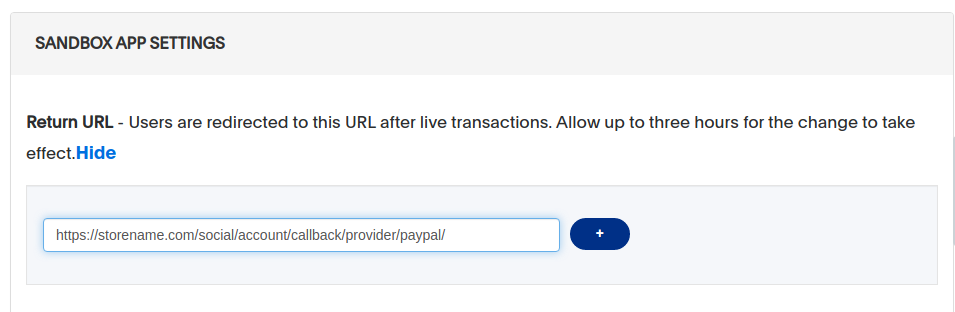
Starting from March 2018, all OAuth apps require a Valid OAuth redirect URIs list. Thus, each OAuth app redirect will be accepted only for URIs included in the list. For example, if https://example.com/facebook/callback is the only URI in the list, then redirects to https://example.com/facebook/callback/tokens or https://example.com/facebook/callback/redirects will no longer be allowed. If your app references a URI that is not in the list, the login attempt will fail. This way, when creating a new key on the Facebook app, your Valid OAuth redirect URI must have the following format: https://[Your domain name]/social/account/callback/provider/facebook |
3.10 Press the Save Changes button.
3.11 Once you've saved all the changes Switch your Facebook APP to Live Mode.

4. Get the API Key and Secret
Go to Settings > Basic. Here you can find the App ID and App Secret.

Navigate to Stores > Configuration > AHEADWORKS EXTENSIONS > Social Login. Paste the Consumer Key and Secret into the appropriate fields of the Facebook configuration section.
1. Create an account with Google
If you are new to Google, you will first need to create an account.
Make sure to fill in all the fields and follow the registration steps provided by Google.
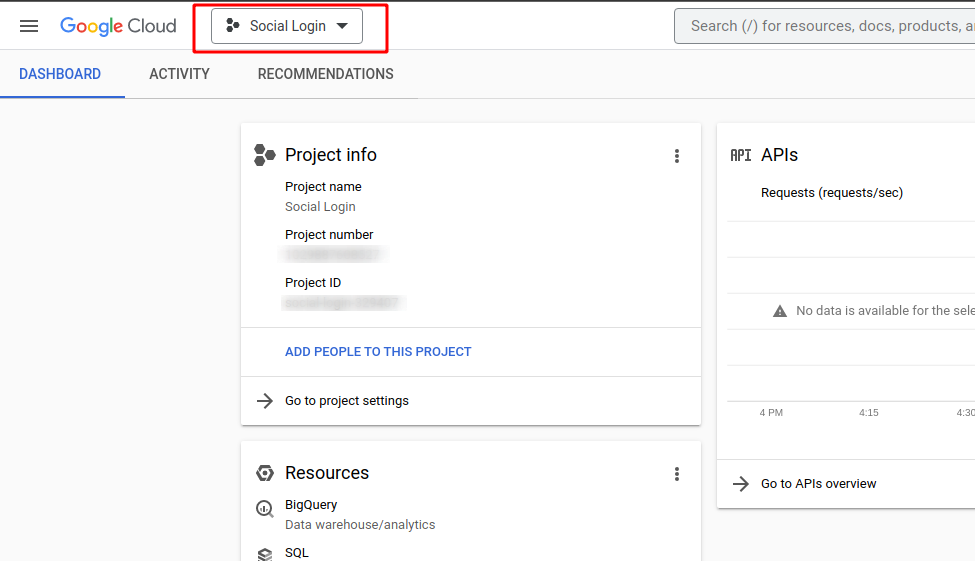
2. Create/Select a Google project
2.1 Go to the Google Developers Console.
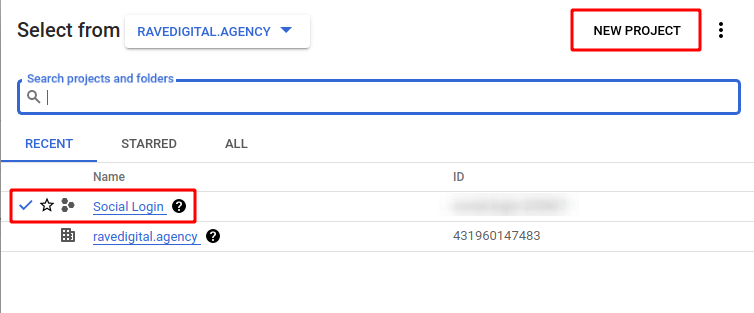
2.2 Click the project drop-down and select or create the project for which you want to add an API key.
To create a new project, click on the New Project button in the top right. To use the existing project, click on the the name of the project on the list.
2.3 Go to the menu on the left and select APIs & Services → Credentials.
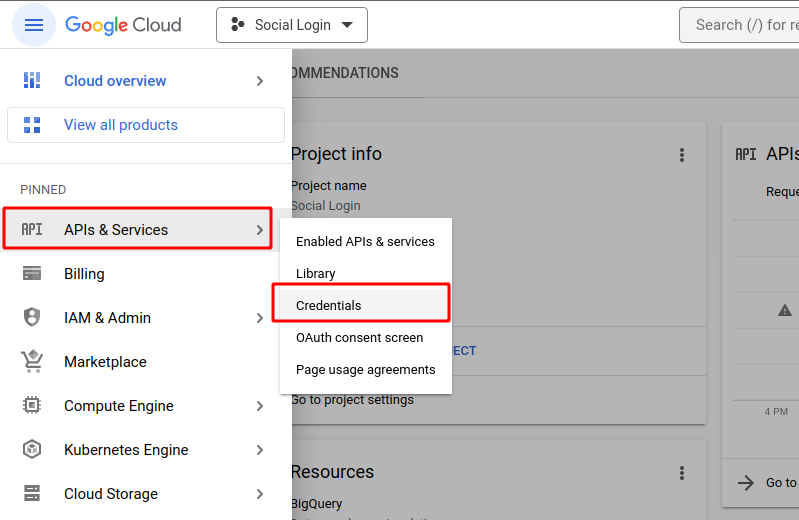
2.5 On the Credentials page, click + Create Credentials → API key or use the API from the list.
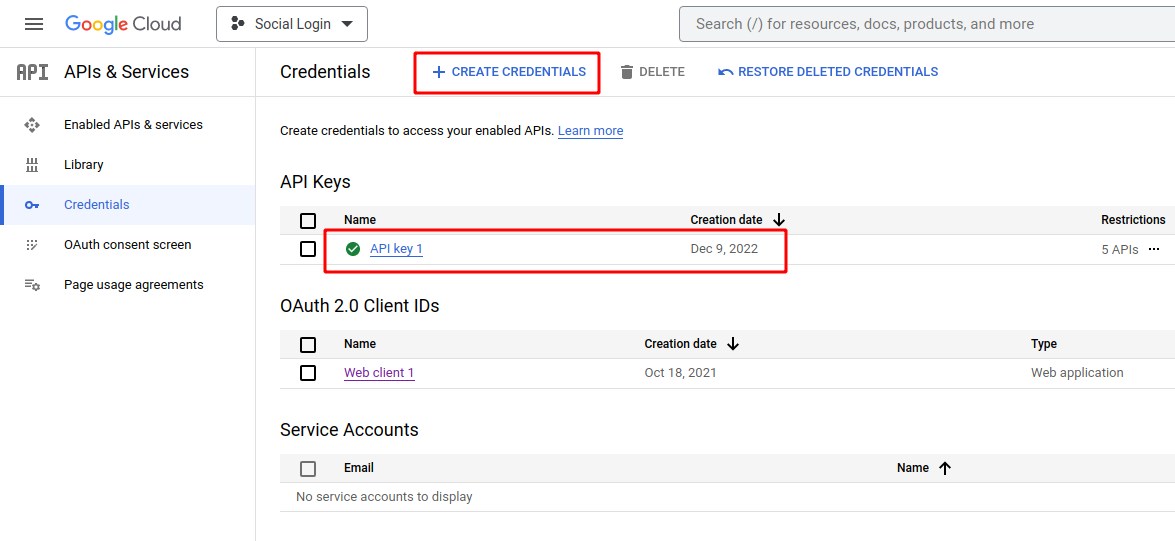
When a new API is created, the API key created dialog displays the newly created API key.
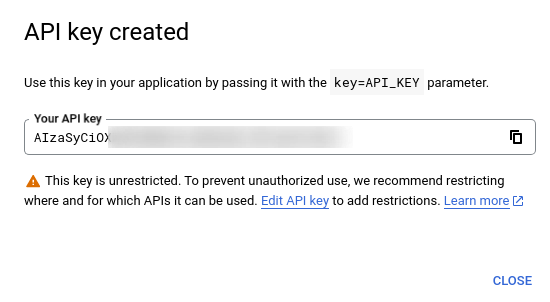
2.6 Click Close. The new API key is listed on the Credentials page under API Keys.
Remember to restrict the API key before using it in production. Restricting API Keys adds security to your application by ensuring only authorized requests are made with your API Key.
3. Set up OAuth2.0
To use OAuth 2.0 in your application, you need an OAuth 2.0 client ID, which your application uses when requesting an OAuth 2.0 access token.
To create an OAuth 2.0 client ID in the console:
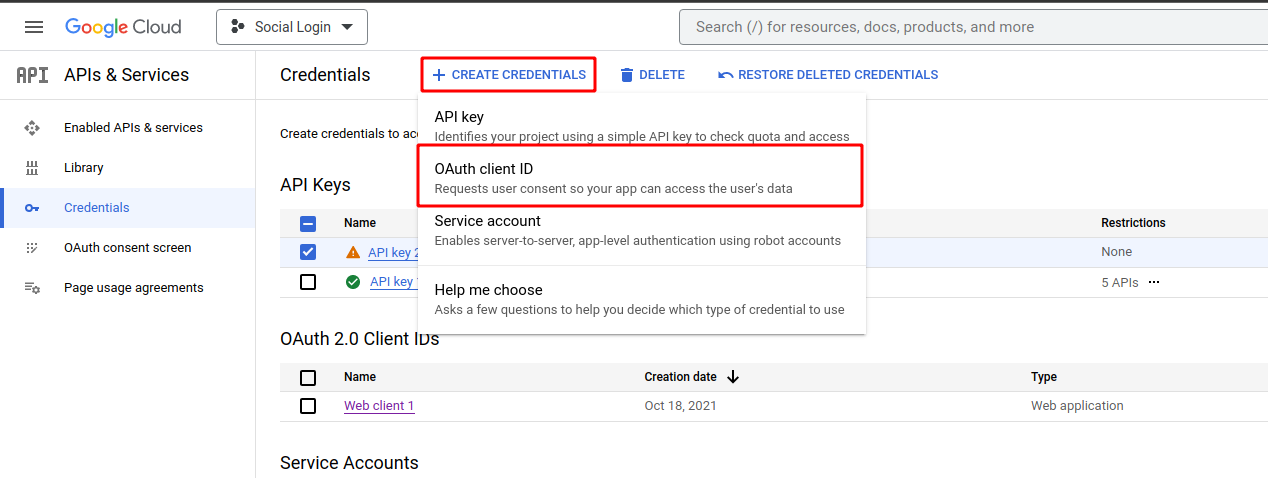
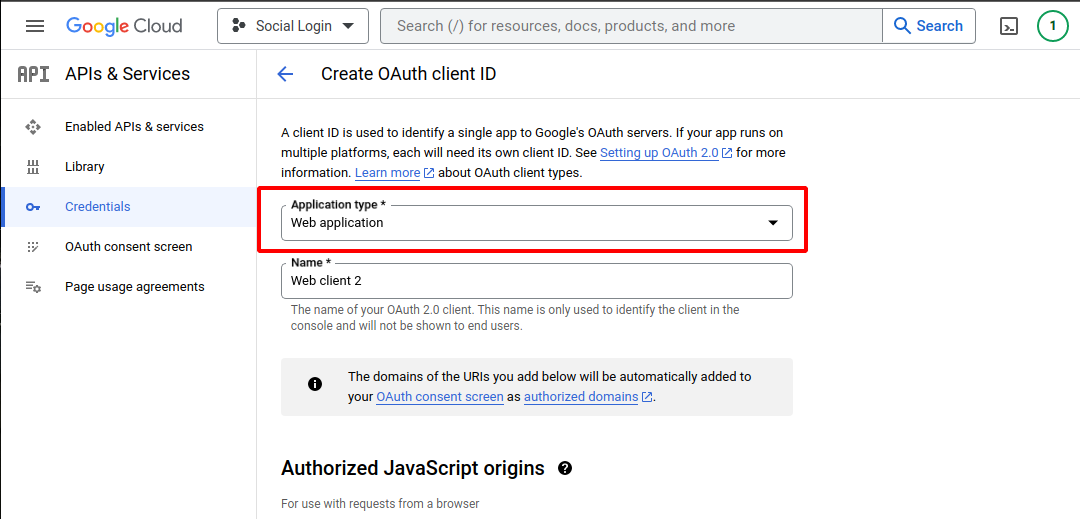
1. Go to the Google Cloud Platform Console → APIs & services → Credentials
2. Click + Credentials, then select OAuth client ID. If you're unsure whether OAuth 2.0 is appropriate for your project, select Help me choose and follow the instructions to pick the right credentials.
Select Web Application and enter the name for the app.
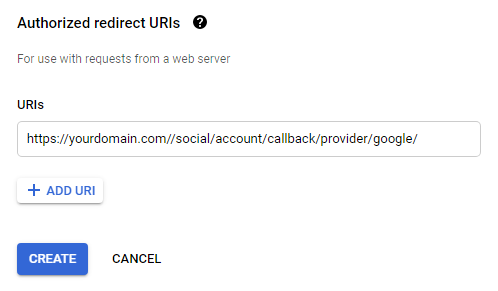
3. Scroll down to Authorized redirect URIs and enter https://yourdomain.com/social/account/callback/provider/google/, where yourdomain.com is the name of your domain where social login is meant to be used.
|
Starting from March 2018, all OAuth apps require a Valid OAuth redirect URIs list. Thus, each OAuth app redirect will be accepted only for URIs included in the list. For example, if https://example.com/facebook/callback is the only URI in the list, then redirects to https://example.com/facebook/callback/tokens or https://example.com/facebook/callback/redirects will no longer be allowed. If your app references a URI that is not in the list, the login attempt will fail. This way, when creating a new key, your input must have the following format: https://[Your domain name]/social/account/callback/provider/google |
4. Click Create
5. Configure Consent Screen
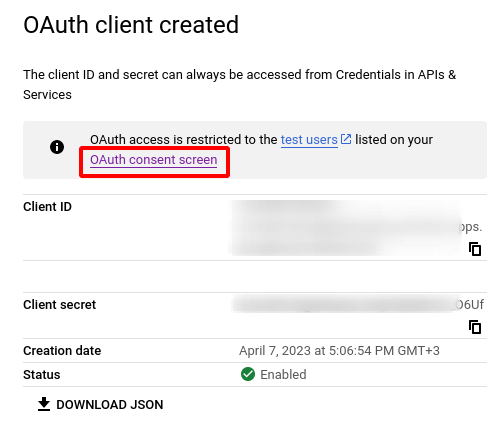
If this is your first time creating a client ID, you can also configure your consent screen by clicking Consent Screen. You will be prompted to do so on clicking the Create button. You won't be prompted to configure the consent screen after you do it the first time.
The following procedure from the native Google Cloud Platform Console Help explains how to set up the Consent screen.
6. Get the API Key and Secret
Go to the Google Cloud Platform Console → APIs & services → Credentials, choose an OAuth 2.0 Client IDs entry and click on the Edit icon.
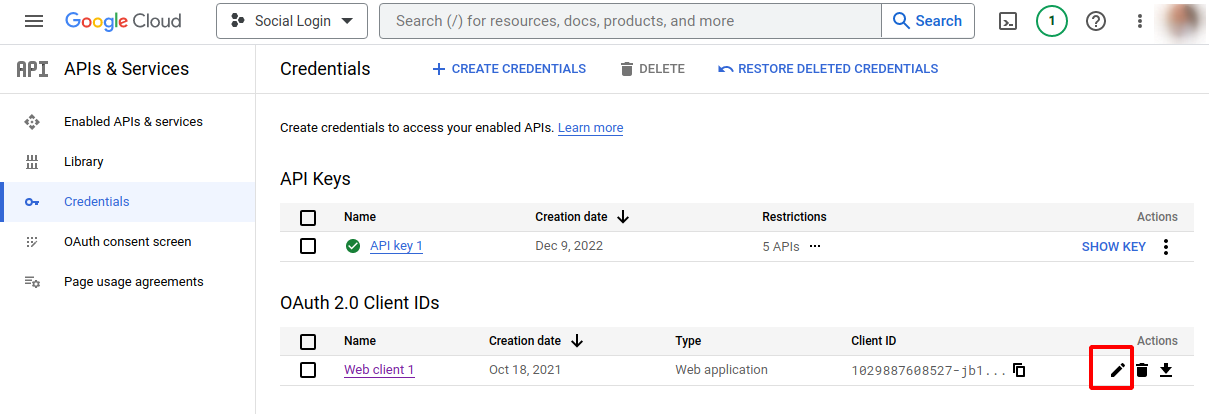
Copy the Client Key and Secret.
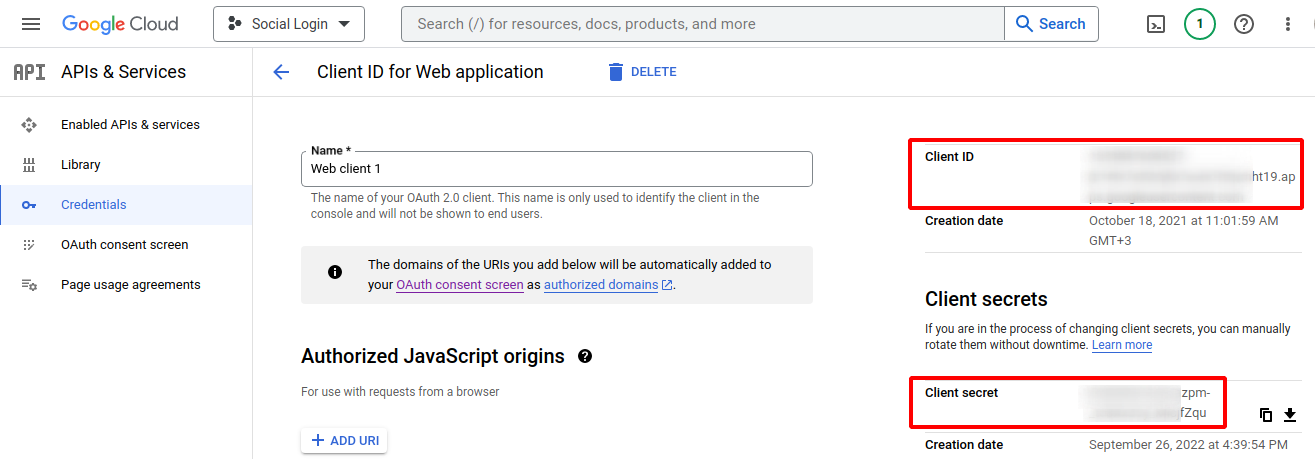
Navigate to Stores → Configuration → AHEADWORKS EXTENSIONS → Social Login. Paste the Client ID into the 'Consumer Key' field and the Client Secret into the 'Consumer Secret' field of the Google configuration section.
1. Create an account on LinkedIn
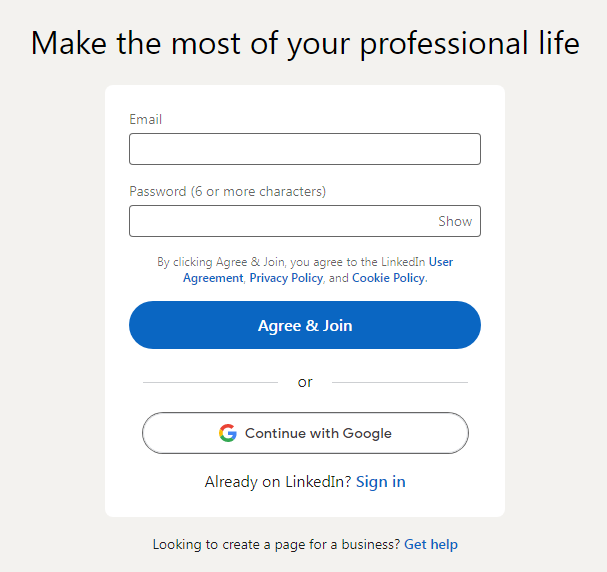
If you are new to LinkedIn, you will first need to create an account.
The account is registered with your email address. Make sure to fill in all the fields and follow the registration steps provided by LinkedIn.
2. Register a LinkedIn application
On the LinkedIn Developers page, click the Create App button in the top right.
Fill in all the Create an app form.
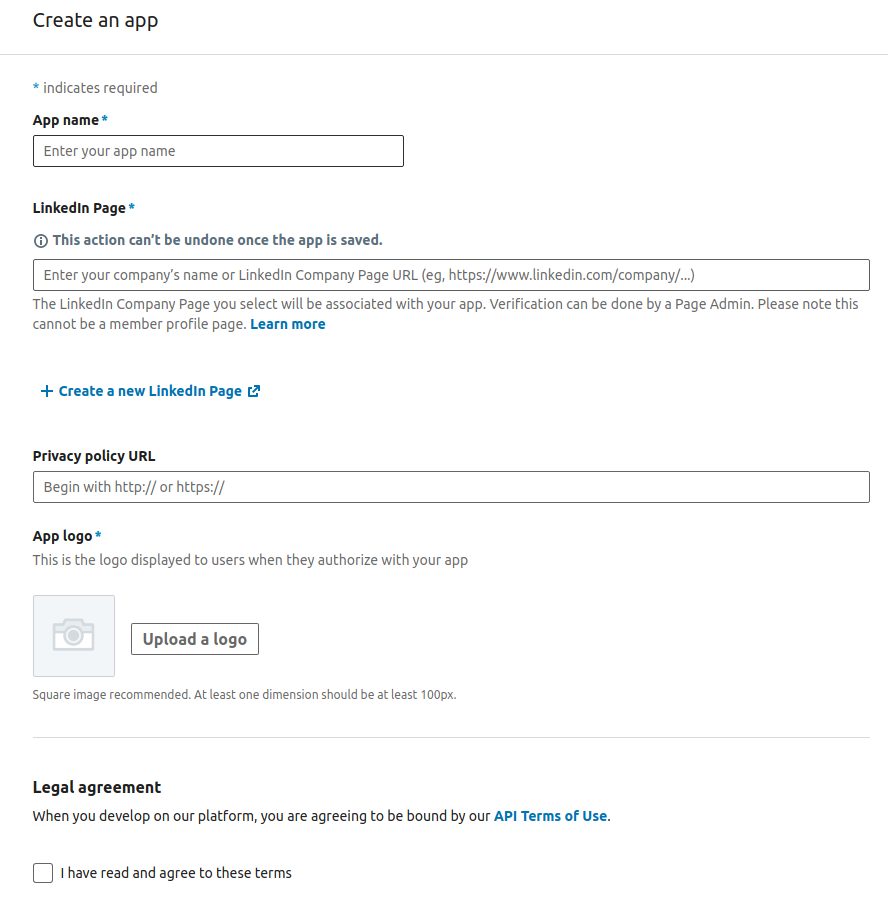
Tick the I have read and agree to these terms check-box, and click Create App below. The application is created. You are now redirected to the profile page of the application.
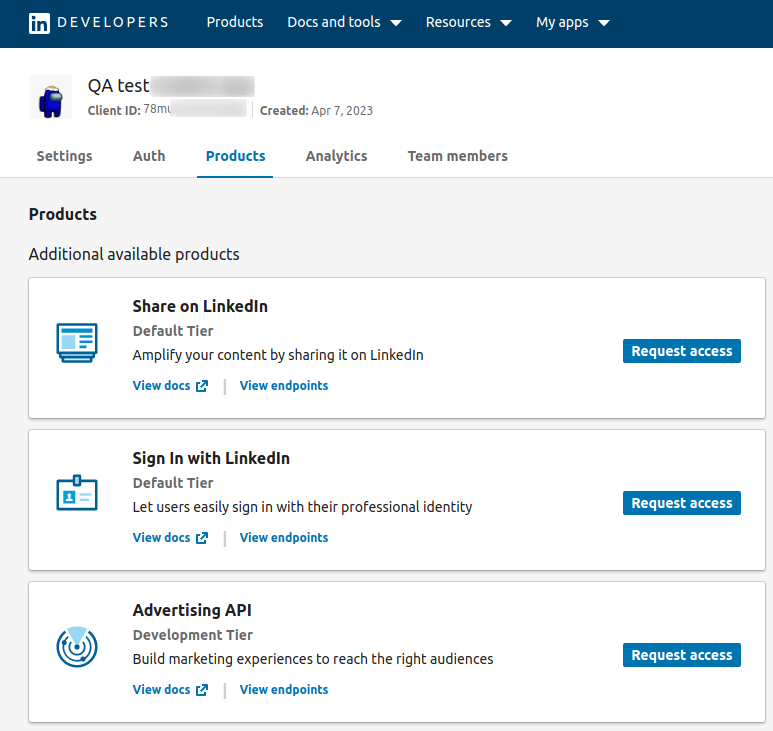
Go to the Products tab and click on the 'Request access' button within the Sign In with LinkedIn block. A popup will emerge, prompting to accept the Legal Agreement and confirm your choice of the product. Accept the Agreement and add the product.
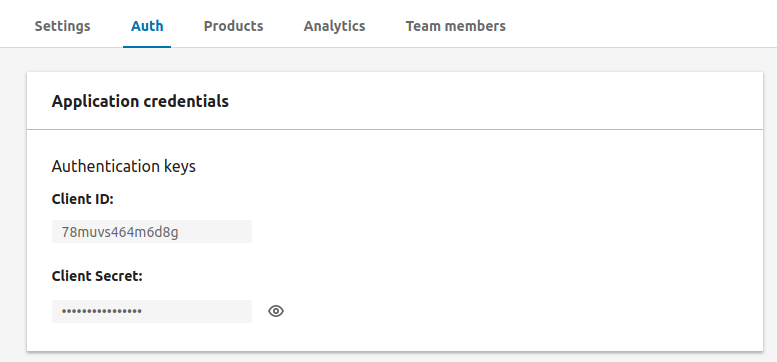
3. Get the API Key and Secret
When on the profile page of the application, select the 'Auth' tab. Scroll down to the OAuth 2.0 settings and suggest the URL of your home-page.
Paste the homepage URL of your store into the 'Authorized Redirect URLs for your app' text-box

|
Make sure that only https URLs will work here for LinkedIn. |
Scroll up the page to find the Authentication keys.
- Copy the Client ID and Client Secret;
- Navigate to Stores → Configuration → AHEADWORKS EXTENSIONS → Social Login;
- Paste the Client ID into the 'Consumer Key' field and the Client Secret into the 'Consumer Secret' field of the LinkedIn configuration section.
That is it. Once enabled, the corresponding LinkedIn button will appear in the set social login block of your store.
Odnoklassniki
1. Create an account on Odnoklassniki
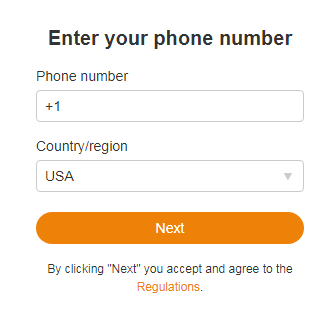
If you are new to Odnoklassniki, you will first need to create an account.
The account is registered with a phone number. Make sure to fill in all the fields and follow the registration steps provided by Odnoklassniki.
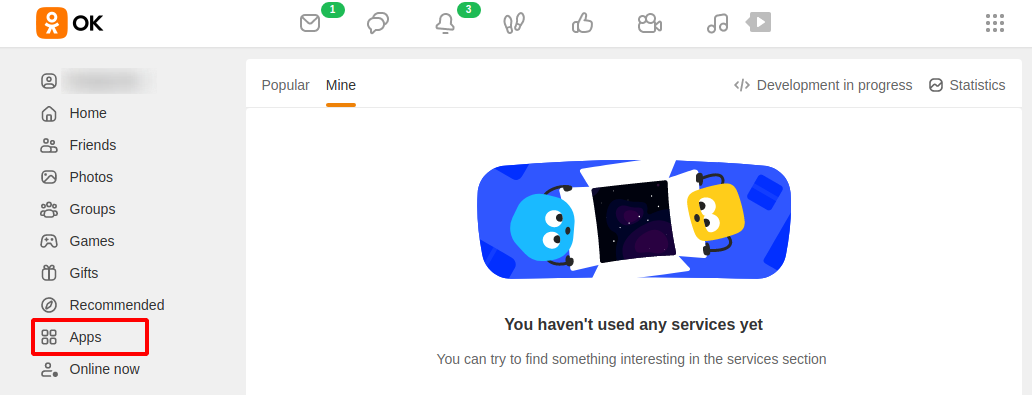
2. Register an Odnoklassniki application
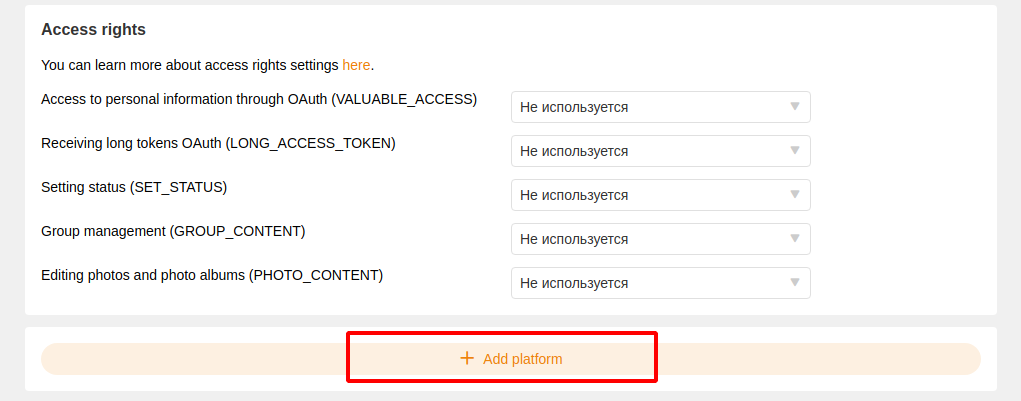
On your Odnoklassniki page, navigate to Apps. Click 'Development in progress' button in the top menu and then click Add App.
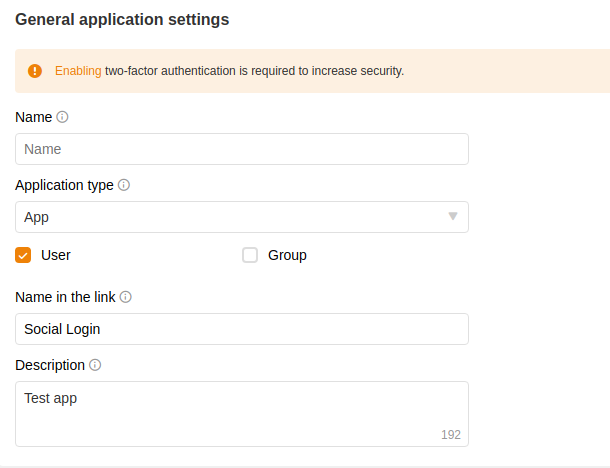
On the 'General application settings' page, enter the app's name, name in the link, description and select Application type.
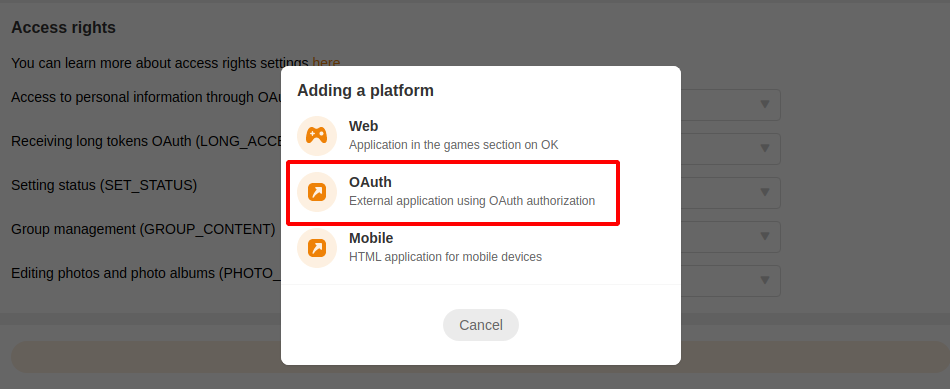
To add a platform click 'Add platform' button and select 'OAuth'.
Scroll up to the External app settings and paste your store homepage URL into the 'Web link' field. Then enter your Valid OAuth Redirect URLs into the 'List of permitted redirect_uri' field. Tick the 'Allow client OauTh Authorization' option and save.
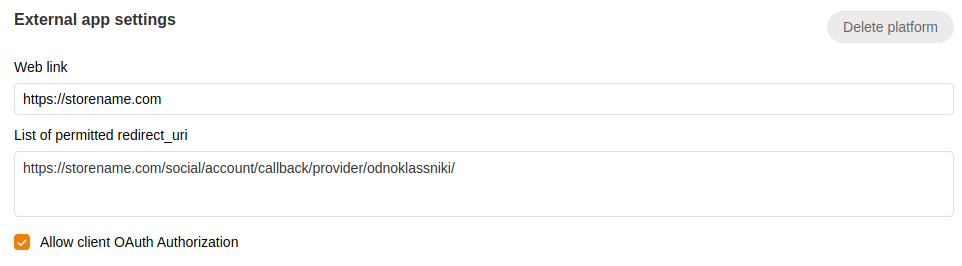
Paste the homepage URL of your store and the /social/account/callback/provider/odnoklassniki/ path right after to the 'List of permitted redirect_uro' field.
The application is now created.
3. Get the API Key and Secret
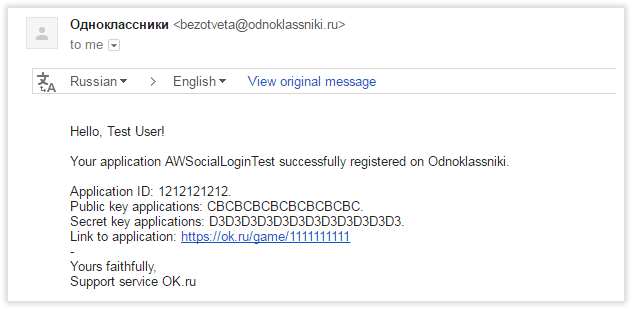
Once the app is registered, you will receive an email from the Odnoklassniki team to the email address connected to your account.
This very email will contain the Consumer Key (Application ID), Consumer Secret (Secret Key), and Public Key.
- Copy the Application ID to the 'Consument Key (Application ID)' field of the social login settings in the Magento backend;
- Copy the Public key to the 'Public Key' field of the social login settings in the Magento backend;
- Copy the Secret key to the 'Consumer Secret (Secret Key)' field of the social login settings in the Magento backend.
That's it. Once you have saved the store configuration, the corresponding Odnoklassniki button will appear in the set social login block of your store.
Vkontakte
1. Create an account on Vkontakte
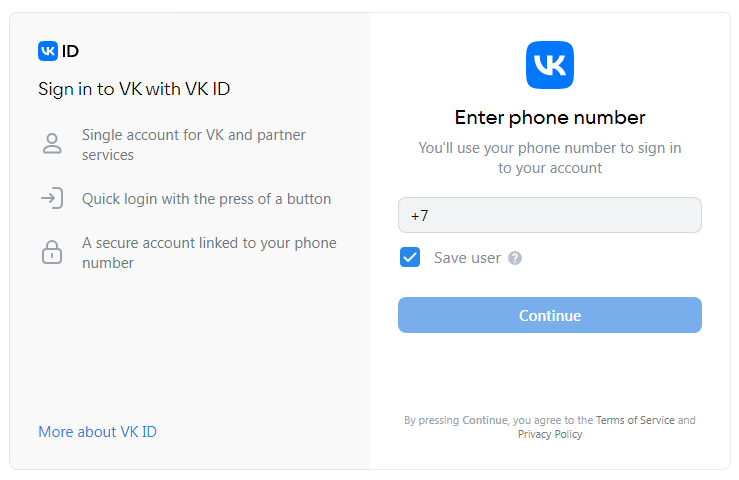
If you are new to Vkontakte, you will first need to create an account.
The account is registered with a email address or phone number. Make sure to fill in all the fields and follow the registration steps provided by Vkontakte.
2. Register a Vkontakte application
Navigate to the VKDevelopers page and get to the 'My apps' page.
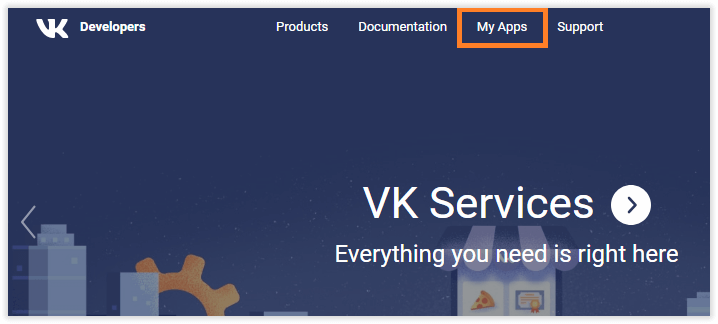
Click on the Create an App to start creating the app.

- Name the application in the 'Title' field;
- Select Website as a platform;
- Paste your store homepage URL into the 'Website address' field;
- Specify the store's Base domain.
Click on the Connect Website button. The application is now created.
Now proceed to the app settings page and specify the Authorized redirect URI.
Paste the homepage URL of your store and the /social/account/callback/provider/vk/ path right after into the 'Authorized redirect URI' field (see the example in the picture below).
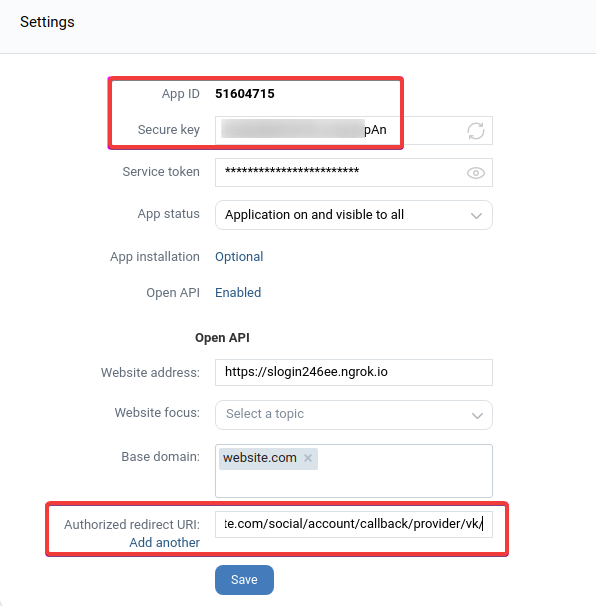
Click 'Save' button. Now you will need to paste the App ID and Secure key to the Social Login extension settings in your store backend.
3. Get the Application ID and Secret key
Once App is registered and configured, navigate to the settings page of the application to get the required credentials.
- Copy the App ID to the 'Consumer Key (API Key)' field of the extension settings in the Magento backend;
- Copy the Secure key to the 'Consumer Secret (API Secret)' field of the extension settings in the Magento backend.
That's it. Once you have saved the configuration, the corresponding Vkontakte button will appear in the set social login block of your store.
Pinterest (https stores only)
1. Create an account on Pinterest
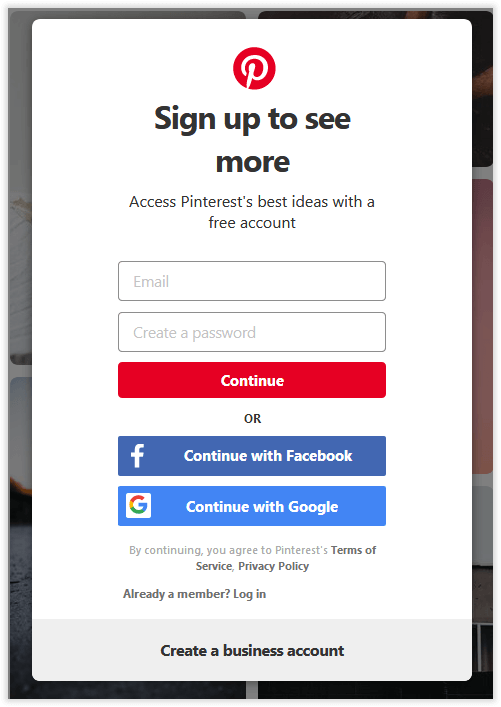
If you are new to Pinterest, you will first need to create an account.
The account is registered with the email address. Make sure to fill in all the fields and follow the registration steps provided by Pinterest.
2. Register a Pinterest application
On the Pinterest Apps page, read and agree to the Developer terms and click on the Create app button.
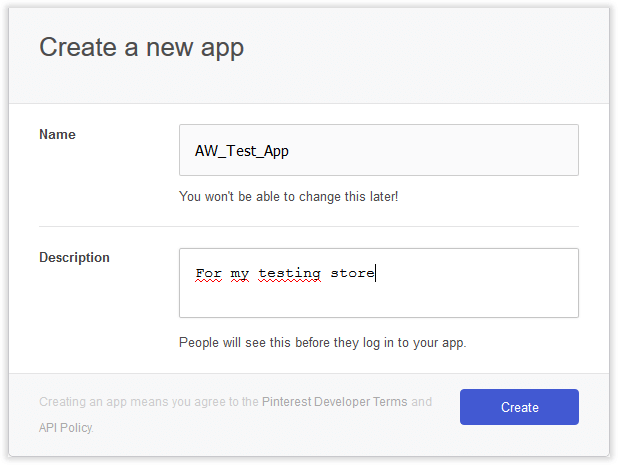
Fill in the app's name and description and click on the Create button.
The app is now created.
Now, scroll the page down to the 'Platforms' block and paste your store URL into the 'Web' fields.
Paste the homepage URL of your store and the /social/account/callback/provider/pinterest/ path right after into the 'Redirect URIs' field.
Once done, click Save and scroll back to the top of the page.
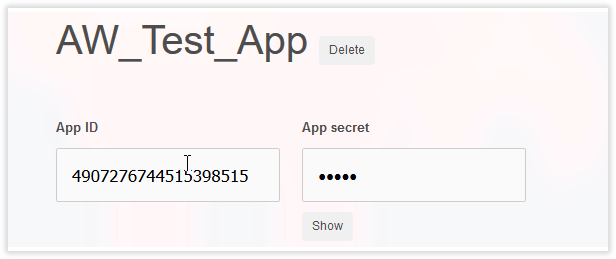
3. Get the API Key and Secret
At the top of the page of the created app:
- Navigate to your store backend Stores → Configuration → AHEADWORKS EXTENSIONS → Social Login;
- Copy the App ID and paste it into the Pinterest 'Consumer Key (API Key)' field of the extension settings;
- Copy App secret and paste it into the Pinterest 'Consumer Secret (API Secret)' field of the extension settings.
- Don't forget to enable Pinterest and save the changes.
That's it. The corresponding Pinterest button will appear in the set social login blocks of your store.
PayPal
1. Create an account on PayPal.
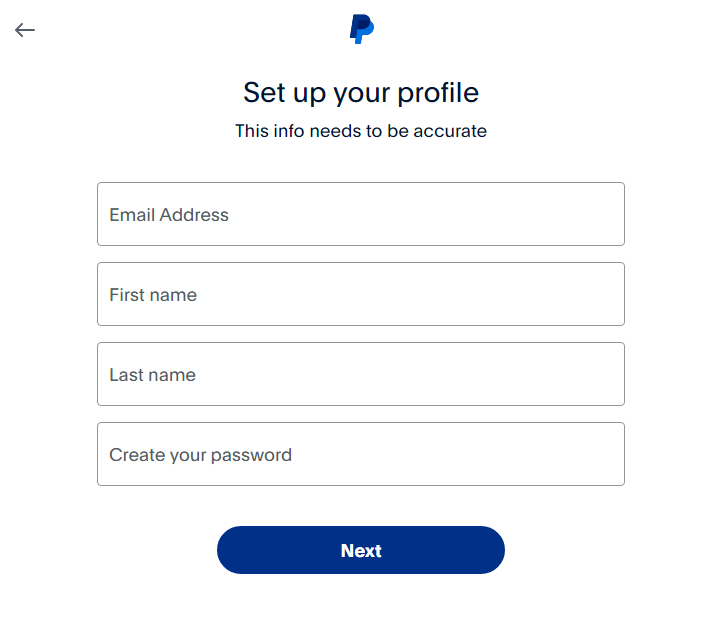
If you are new to PayPal, you will first need to create an account.
Make sure to fill in all the fields and follow the registration steps provided by PayPal.
2. Register a PayPal application
- Go to developer.paypal.com and log into Dashboard;
- Click Create App on the 'My apps & credentials' page;

- Enter the app's name and click Create App to complete the process.
|
In the top right-hand corner of the page, you can toggle between the sandbox and live app information. |
-
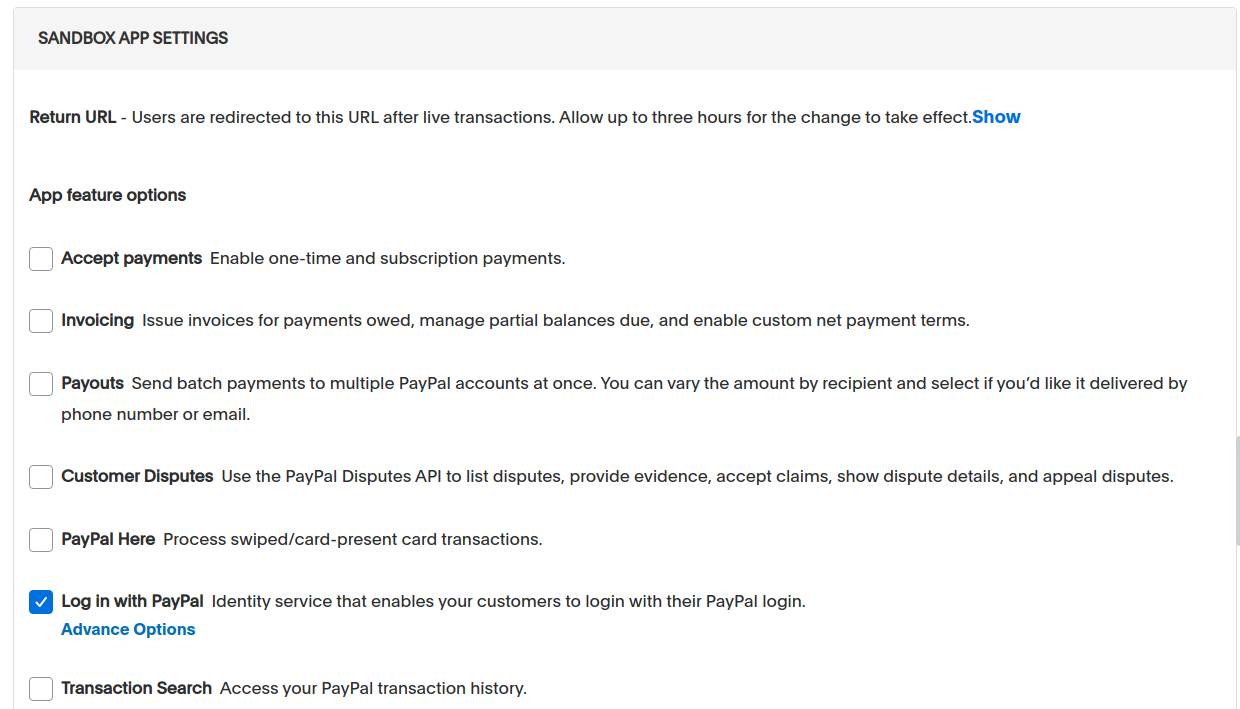
Deselect all the checkboxes except Log In with PayPal and fill in all the information requested when you choose Advanced Options. Finally, save all the changes you have made.
3. Get the API Key and Secret
- Copy the Client ID and Secret from the corresponding fields in the Sandbox API Credentials;
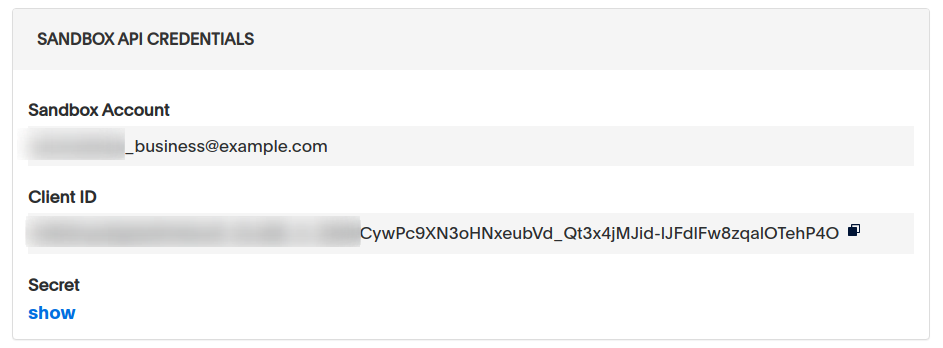
|
When making API calls, you need to use the sandbox or live account's client ID and secret credentials for authorization. The sandbox credentials are applied for testing. For live transactions, live credentials are to be applied. By the way, for live transactions, you need to upgrade from a personal to business PayPal account. |
- Navigate to Stores → Configuration → AHEADWORKS EXTENSIONS → Social Login;
- Paste the Client ID into the Consumer Key field and the Client Secret into the Consumer Secret field of the configuration section.
That's it. Once enabled, the corresponding PayPal button will appear in the set social login block of your store.
Getting Around
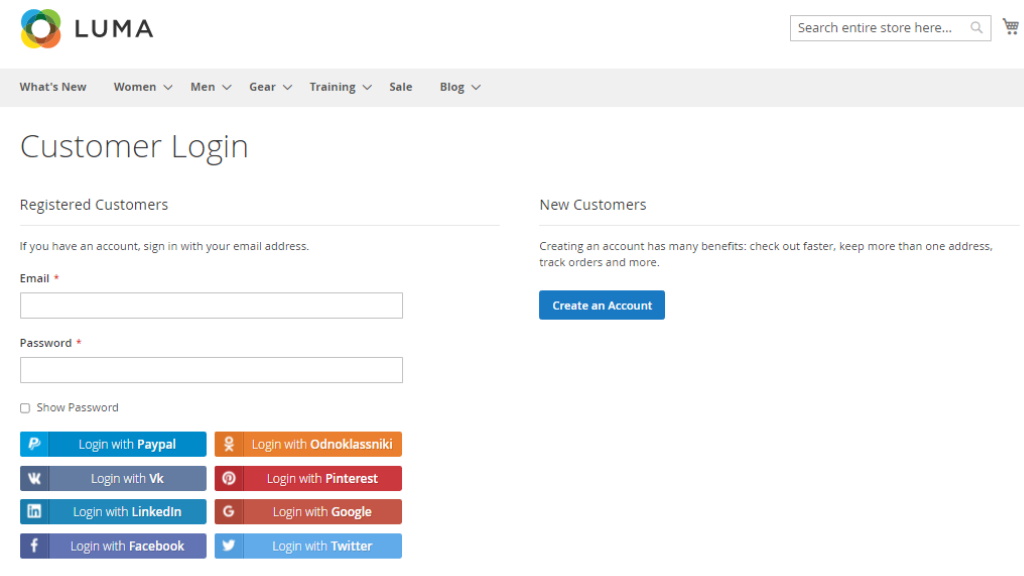
The Social Login extension is ready for work right after installation. It comes with a set of social login blocks that can be enabled separately for register, login, shopping cart, and checkout pages.
The blocks can contain up to nine login buttons: PayPal, Odnoklassniki, Vk, Pinterest, LinkedIn, Google, Facebook, and Twitter. With the social login buttons, customers can log in to a website with one click (provided that they are already logged into the corresponding social network).
How an account is created?
Whenever customers click a social login button, they get redirected to the corresponding social network page. At the social network page, they need to confirm that they want to use their social accounts to log in to the store.
Once confirmed, customer is taken back to the store. The account is created.
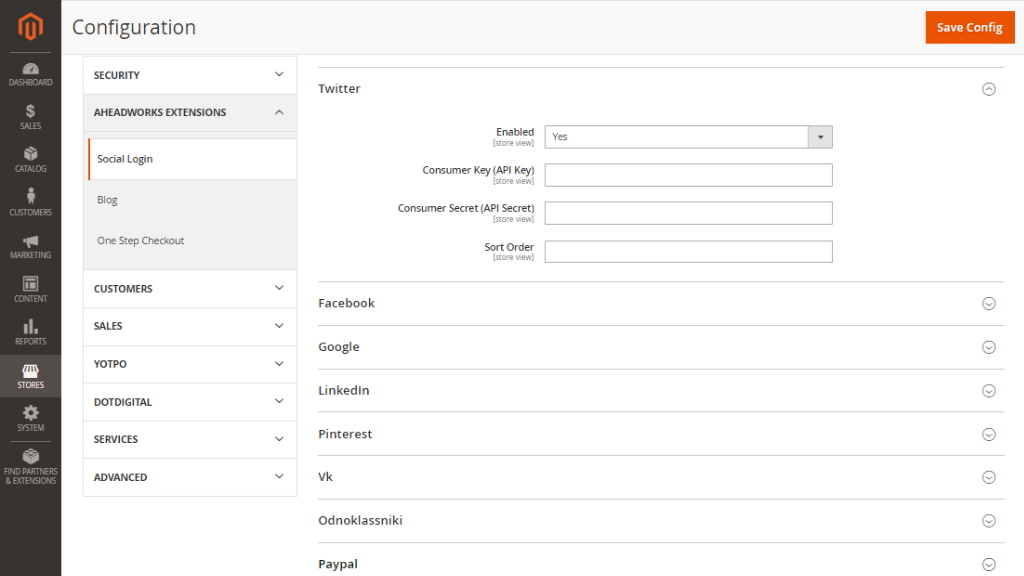
Extension Configuration
The extension introduces its settings section in Stores → Configuration → Aheadworks Extensions → Social Login.
Within this section, you can decide on which store pages social login blocks should be displayed. Additionally, you can include/exclude the required social networks from the social login block.
The section comes with the following settings:
- Enable Social Login - enables/disables the extension's output;
- Login Blocks - enables/disables the default login blocks and allows adding custom blocks;
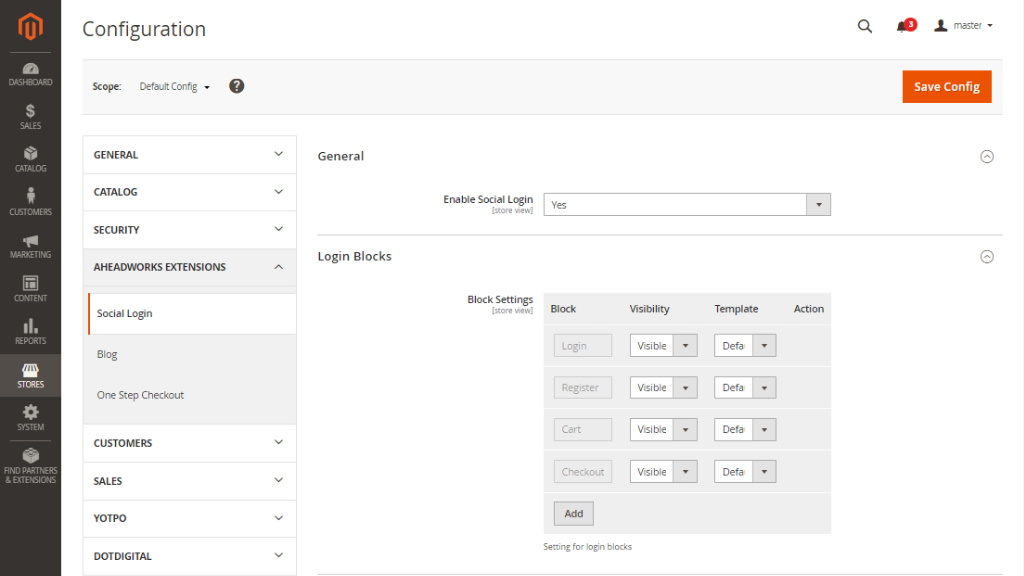
- Twitter/Facebook/Google/LinkedIn/Pinterest/Vk/Odnoklassniki/Paypal - these sections allow enabling/disabling particular social networks for logging-in purposes and store appropriate consumer keys and secrets.
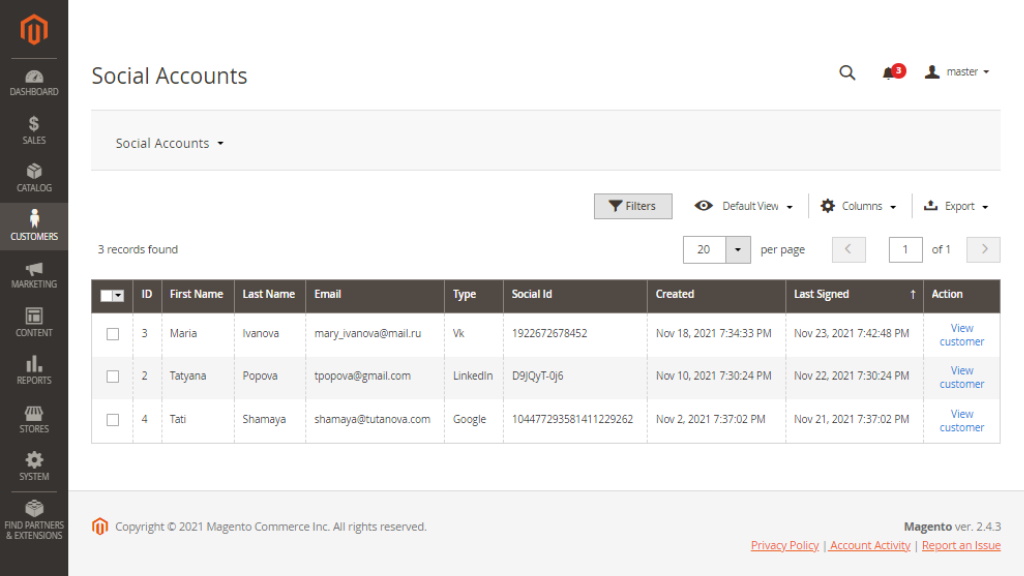
Managing Social Accounts
Another section the extension introduces to the store backend is 'Social Accounts' found under Customers → Social Login by Aheadworks → Social Accounts.
Customer Area
At the frontend of the store, the Social Login extension introduces the 'My Social Accounts' customer account section.
In this section, customers can view and manage their social accounts (by linking new and unlinking current ones).
Having linked a social account, customers can log in to the store in one click and then proceed to the catalog.
Rich Banner Slider introduces its sections under Content → Rich Banner Slider by Aheadworks. The extension comes with three sections:
- Slides - allows store administrator create and manage slides;
- Banners - allows store administrator create and manage banners;
- Statistics - provides an overview of the banner and slides performance.

Adding a Social Login Widget
Widget Layout Update
New login blocks can be added to custom positions through the native Magento widget functionality.
To add a new widget, navigate to Content → Elements → Widgets and click on the Add Widget button.
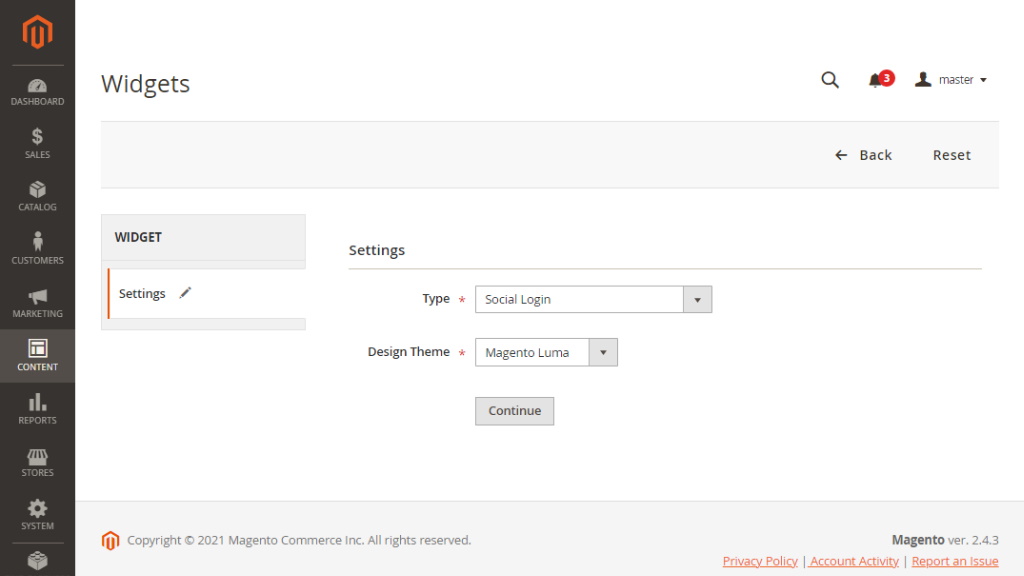
Choose Social Login in the 'Type' dropdown and click on the Continue button.
On the widget options page, configure the widget as per your requirements:
- Define the widget's name;
- Store view;
- Position.
Once the widget is saved, a new social login block will be displayed in the position set.
Adding the Widget to Website Pages
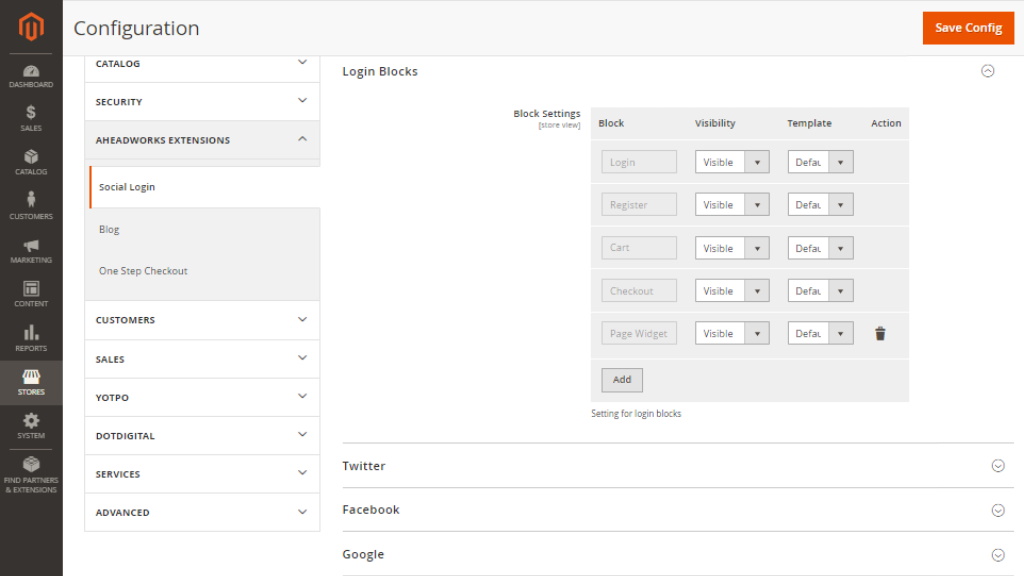
To add the widget to a particular CMS page of your store, the first thing you need to do is to create a new login block.Navigate to the extension settings in Stores → Configuration → AHEADWORKS EXTENSIONS → Social Login.
In the 'Login Blocks' configuration section:
- Click on the Add button;
- Name the new Login Block ('Page widget' as per illustration);
- Click on the Save Config button.
After the login block is added, navigate to Content → Elements → Pages and add new or select the existing page:
In the content field of the page, select the required position:
- Click Edit with Page Builder button;
- Set Widget Type to Social Login;
- In the Widget Options, select the new Login Block you created ('Page widget' as per illustration);
- Click on the Insert Widget button.
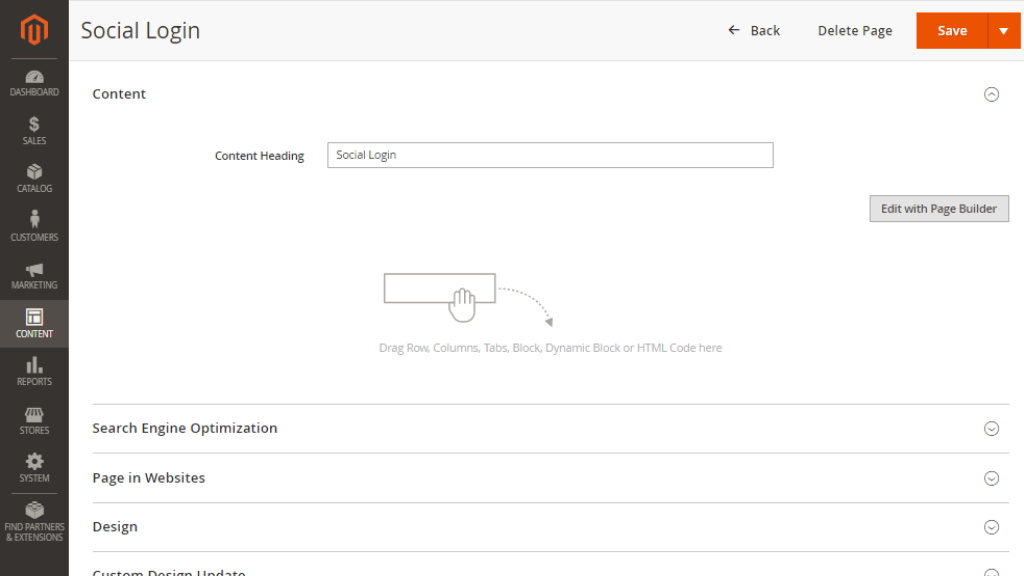
Now you can save the CMS page, and the Login Block will be displayed in the required position.
![]()
Already used our product?
We would appreciate your feedback. Please, leave a review.